Your device is pretty much useless without being on your network. You have at least 3 options to get it on the network. The idea is that you need to connect a networking/patch cable from your device to your network.
Option 1 - If your garage door controller is going to be close enough to your router/switch, you can just use a pre-fabbed
Cat5/Cat5e/Cat6 patch cable from the router/switch to your garage door controller.
I don't think this one really needs much explanation. Just tack up your patch cable from the garage door controller to your router/switch, plug it into your router/switch, and call it a day.
Option 2 - Very similar to option 1, except that this way is theoretically cheaper, but requires a little more work.
If you need to run the network cable a longer distance than a patch cable that you can get a hold of, or if you already have some, you can run un-terminated Cat5/Cat5e/Cat6 network cable (cheaper than pre-fabbed patch cables). Then put the end connectors (RJ45s) on the ends yourself.
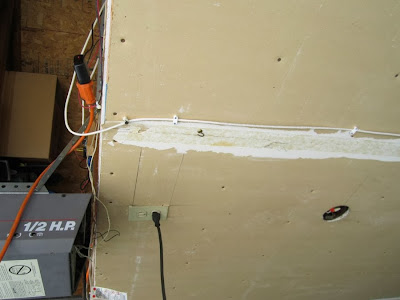
This is the route I took for my own house...here's a couple photos:
 |
| White Ethernet cable tacked to the ceiling of my garage |
The other end connected to my network:
 |
| Yes, it's a little messy |
It's actually not difficult to put the end connectors (RJ45s) on yourself.
This Instructable is pretty good and easy to follow. Or, if you prefer a video,
this is a pretty good brief tutorial.
Option 3 - If running cable is going to be too difficult/inconvenient, and you have a wireless network already, you can use something like a
TP-Link TL-WR702N Wirelss N150 Travel router. You configure it for your network as a 'client' instead of a 'router', then plug a
short, inexpensive patch cable from it to your garage door controller, and you're all set.
Just to elaborate on this option a little bit:
If you do want to use a wireless device such as the above, there is a little configuring you need to do. You'll need some information about your wireless network, such as: SSID, MAC address of your
existing router/access point, WEP Key Index (if using WEP), and the key/passphrase/password.
As far as how everything fits together physically, here's a photo of a finished installation that I did for one of my sisters:
The TP-LINK device is the blue square device near the top-right of the image above. It has an Ethernet patch cable coming out the bottom (it's the dark gray cable coming out the bottom-left of the device) connecting to the garage door controller. The lighter colored cable coming out the bottom to the right of that is the power cable. So adding this extra little device is actually pretty simple and straight-forward.
Now that that's done, let's go to
Step 8 - Mount and connect.
Return to previous -
Step 6 - opened/closed sensor (optional).


