The beautiful remote shown below is the Philips Pronto TSU3000 remote. It is an incredibly flexible and powerful remote. Brand new I think they sold for around $350-$400 (depending on where you bought them). I picked this one up on eBay a few years ago for around $230. Unfortunately Philips doesn't make them anymore. And even more unfortunately, for mine, the touchscreen stopped working a couple years ago, rendering it pretty much useless.
 |
| Philips Pronto TSU3000 |
The problem, specifically, is that you touch the screen, and it turns on as it should, but after that, is unresponsive to anything else - any buttons that are on the screen will not work. :( The 'hard' buttons still seem to work, but that does no good if you can't select your 'device' from the touchscreen.
Below is a brief video demonstrating the remote's problem:
If you have this remote with this particular problem, read on to learn how to resurrect it...I just resurrected mine, saving me a couple hundred bucks (buying another used one on eBay).
A couple words of caution: You should wear an anti-static wrist strap when performing the following steps. At the very least, don't rub your feet around on the floor (especially if your floor is carpet) while working. If you don't wear the anti-static wrist strap, touch something metal once in a while. Also, try not to touch any of the circuitry/electronics of the remote...only touch edges of the circuit board if you have to. Only touch plastic parts where possible.
Disclaimer: I am not responsible for any damage you may cause to yourself, your remote, your pet chinchilla, or anything else while performing any of the below work. That being said, it's pretty straight forward, and if you use common sense and caution, everything should go well without any 'incidents'.
One more thing: I am not guaranteeing that this hack will work for you. Even though the 'symptoms' may seem the same, the 'cause' may be different. Or, you may not follow the procedure properly.
Now that all of that stuff is out of the way...click the 'read more' link below to get started!
You'll need 3 tools (maybe 2). You definitely need a T6 torx wrench. You definitely need a sharp knife. You might need a small slotted/flat head screw driver. Here's my remote with the tools I used:

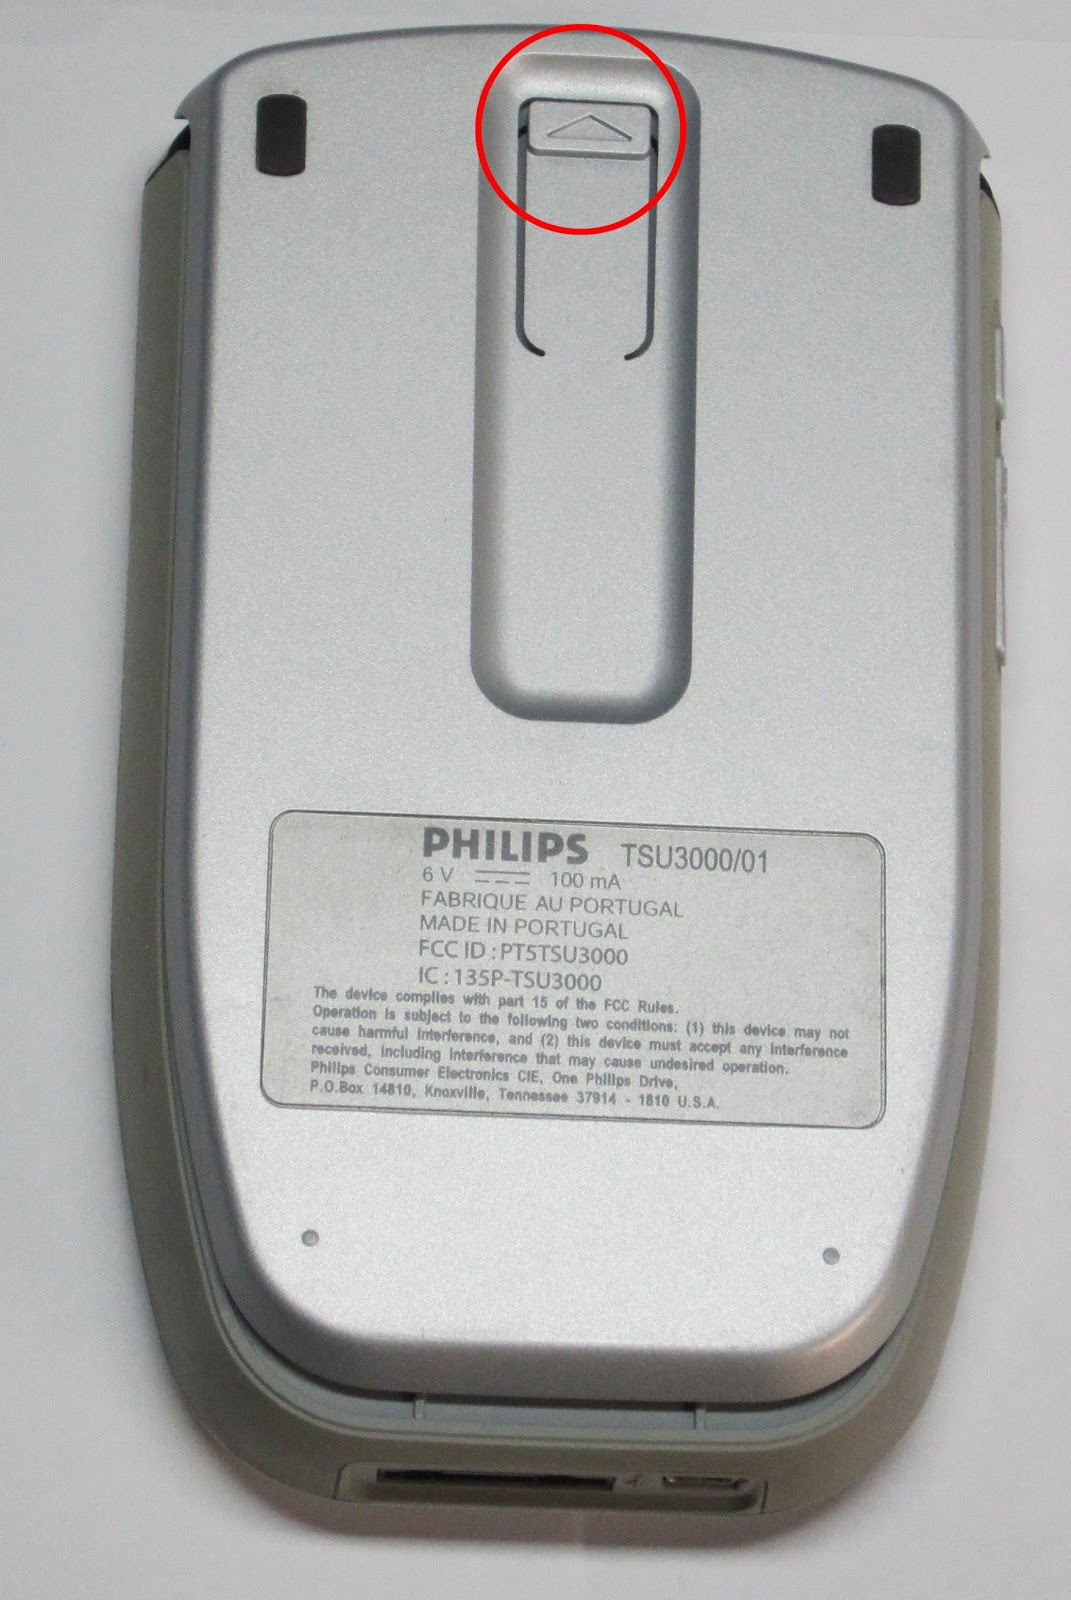
Step 1 - Remove back cover
Flip the remote over, and push down on the little arrow tab, and slide the back cover up as shown below.
Step 2 - Remove battery
After you remove the back cover, pull the little white connector for the battery out. (Try not to pull the wires...try to pull the actual white connector if possible)

Step 3 - Remove 4 small torx screws
When the battery is gone, use your T6 torx wrench to remove the 4 screws (circled below).

Step 4 - Separate/pry the 2 halves apart from each other
Using your finger nail (if possible) or your small flat head screwdriver, pry apart the 2 halves of the remote, very carefully. Do not rush this step or use too much force or your remote might go flying out of your hands. You may need to work a little bit at a time, all around the remote. Just take your time and be patient.


Step 5 - Take a breather, you're doing good, and examine your parts
You're doing good so far, so take a breather. Also, you can examine the parts you have taken apart and kind of note how they came apart and where they go. For instance, a little gray frame/bezel may have fallen out like it did on mine:

And maybe flip the main piece (the one on the right) over to see the back:

You can set aside that little gray frame/bezel piece, and the large piece (shown on the left) aside as we won't need them until we re-assemble.
Step 6 - Unscrew the last screw
There is a small T6 screw (so use your T6 wrench) to unscrew.

Step 7 - Flip over, remove main plastic bezel, small clear spacer
Once the screw is out, flip the whole thing over, and carefully remove the main plastic bezel. Take your time on this too, carefully separating each area that is clicked/snapped in. Watch out for the hard buttons/membrane.
At the top area, I have circled the small clear plastic piece that will either fall out, or you need to take out. Note how it is placed in there for when you put it back. Below, I have circled the hard buttons on the membrane that will be loose now. You can leave it there, just don't freak out that it's loose.
Step 8 - Remove touchscreen frame
Carefully remove the blue-gray plastic frame that frames the touchscreen. It may get caught a little bit near the hard buttons on the right, so just be careful, and go slow here too - we don't want to break anything.

Step 9 - Find the problem area
Below you will find circled the 'problem' area that we are looking for.


Step 10 - Cut!
With your knife, make a few (I did 3 each) 'pricks' down into each of the 4 DARK brown areas.


Mission accomplished? Hopefully this fix/hack will work for you, but we won't know until we get everything back together, so let's do it!
Step 11 - Replace touchscreen frame and plastic spacer piece
Replace that blue-gray plastic frame for the touchscreen. Then place the clear plastic 'spacer' piece back where it goes (circled in the picture below).

Step 12 - Replace main plastic bezel piece
Carefully replace the main plastic bezel piece over everything. Make sure that the hard buttons / membrane (circled below) are in the right place so that it will go through the main plastic piece properly. Look at the 2nd picture before you do this though for a tip.


This 2nd picture shows how you need to make sure that when you place the main plastic bezel back on, the little standoffs (actually I don't think they're standoffs...that's just what I'm calling them) need to line up to go through the circuit board.
Step 13 - Replace single screw
Remember our 'final' screw that we removed a little earlier? Put that back now, ok?

Step 14 - Replace little gray piece if needed
I did mention that the little gray bezel/frame piece that might fall out, right? Well, if yours did, you really should put it back now. First picture shows it separate. The second picture shows it re-attached.


Step 15 - Snap both halves together again
Snap together the 2 main halves of your remote, being careful about that little gray piece - it may want to come out again. So with this step also, take your time.

Step 16 - Replace the 4 screws
Once everything is snapped back in place, you can replace the 4 screws you removed from step 3. No need to overtighten...just nice and snug is fine.

Step 17 - Replace the battery
Look at the images below for how I recommend you put the battery back if you don't remember how it went.


Note that the red wire goes on 'top'. Once you've got the battery in and plugged in, tuck the wires down a little bit and tell them goodnight.
Step 18 - Replace back cover
Remember how you took the back cover off? Well now you need to 'reverse' the procedure. Put the cover back on positioned as shown in the first picture below (slightly offset 'upwards'). Then with a little bit of downward pressure (straight down to the desk/ground), slide it down, and it should snap right into place properly as shown in the second picture.


All done!

You are finished! If all went well, your remote should work again. See my video below demonstrating my 'resurrected' remote after I followed the procedure as described above:
Lastly, I cannot take credit for this fix - I found the information for this on the Remote Central forums, particularly this thread. If this little hack doesn't fix your remote, then maybe one of the other fixes found on that thread will.
Thank you for reading, and I hope this was helpful and works for you!
Update 1/26/13 - Here's the full video tutorial on how to take apart your remote, perform the fix, and re-assemble:
OMG!!!!! THIS REALLY WORKED!!!! I FOLLOWED THIS GUYS BLOG AND HOW TO REPAIR MY PHILIPS PRONTO TSU 3000 REMOTE AND I FIXED IT! MY TOUCH SCREEN WOULD NOT WORK UNTIL I DID THE STEPS IN THIS BLOG. IT REALLY WORKS AND I AM SO HAPPY THAT I SAVED HUNDREDS OF DOLLARS!!!! THANKS DUDE
ReplyDeleteI don't know how you figured this out, but you just definitely saved me some cash and headaches. Cheers Duder!
ReplyDeleteFixed my TSU 3000 in about 30 minutes tonight, after it has been out of commission for about a year. This fix really works. Thanks!!!
ReplyDeleteTony Biegler
Thank you so much for this hack/fix! I did not use my TSU 3000 for several years, since it got broken. But hooray, now it is working again!!
ReplyDeleteThank you all for your kind words. I'm glad this post/video helped some people out there.
ReplyDelete